Sunday, April 25, 2010

Homemade Tagliatelle and Pesto (Like the Italian Flag)


Do you prefer risotto or pasta? Do you picture yourself in the noodle or the rice fraction?

Last winter we cooked a lot of risottos. When I eat a creamy risotto, I am convinced that I come from the risotto fraction. On the other hand, when I taste savory al dente pasta, I am not so sure anymore. I think I like both pasta and risotto evenly.

Although it is easy, these days, to get dry or fresh Italian noodles of good quality, we wanted to buy an Italian pasta machine for a long time. However, a couple of weeks ago I got one as a birthday gift from my husband’s aunt, Joëlle. We “baptized” it rolling out Polish-style pasta dough for pierogi with potato and cheese.

To my surprise, finding, in our neighborhood, durum wheat flour, which is necessary for al dente Italian pasta, was a pain in the neck. The closest, and, as we were convinced, one of the best food stores – La Grande Epicerie de Paris, simply does not carry it. My husband checked with all Italian grocery stores located in our arrondissement, and came back empty handed. In one of these stores, all eight packs of durum flour - totaling 8 kilos - had just been purchased by someone.  In a second store, another few kilos had just been bought out the same day, most likely by the same mysterious pasta maker…
Finally, we searched the 14th arrondissement and found a place which we will keep secret for the time being...

For our tagliatelle presented today, we decided to use a recipe taken from the booklet enclosed with the pasta machine. This recipe is quite good. However, I only started searching for fresh pasta recipes, so if anyone of you reading this post has an Italian grandmother, please, share the recipe.


We did not make pesto for quite a while and Karolina reminded me how easy, tasty and good it is.

Making pesto is a genius idea for its endless possibilities to use your favorite ingredients: fresh vegetables, herbs, leaves, nuts, cheeses, including tofu. It is genius in its simplicity. The final effect is always positively surprising taking into account the amount of work implied. I love pesto also because you can use it as a savory garnish to various dishes, starting from pasta, then gnocchi, polenta, sandwiches, tartines, grilled meat or fish, soups,  salads, tarts, pizza, French galettes au sarasin. You can even garnish some Polish style pierogi, Polish style gnocchi (kopytka; kluski slaskie), even sometimes Polish style kasha, and other cereals.

While classical pesto Genovese and Provencal pistou remain my favorite, curiosity always pushes me to search for new mixtures and to try new recipes.

My first experience with pesto, however, was not yummy. It was maybe 15 or more years ago, when I bought my first jar of industrial pesto Genovese. I can remember until today how ugly it was. At that time, fresh herbs were not available in stores so you could forget about homemade pesto Genovese. 

Once I started to plant fresh herbs, and fresh herbs became available at least in summer, I started preparing homemade pesto on a regular basis.

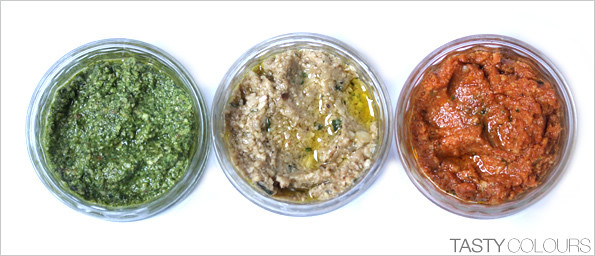
When preparing variations of it, I do not follow any particular recipe, however I regularly check what appears on culinary blogs; I rather trust my intuition to find my favorite taste, smell and texture, like last time, when I made three kinds of pesto which colours I chose to be those of the Italian flag – the green one with arugula and basil; the red one with semi dried tomatoes and baked red bell pepper and the white one with baked eggplant and garlic.

Holding a plate with fresh al dente pasta mixed with “umami” pesto I am looking at it and I am pondering whether the smell of it or the taste of it is the better one… Should I just eat it or simply stare at it and enjoy the smell? Paired with a glass of wine, on a warm summertime evening, one does not need anything else to feel happy and relaxed for a while.

I make my pesto in a food processor. This is not what is advised in classical recipes, but being occupied by duties of daily life, I do not have time to use the classical techniques.

Surfing on various culinary blogs and reading books and culinary magazines, I found so many variations, mixtures and ideas for pesto, some more traditional, some more avant-garde. I simply noted some ideas in my mind a while back, and I am not able to recall where they came from. Most of recipes use pine nuts, almonds or walnuts, as well as pistachios, macadamia and other nuts; hard cheeses, like parmiggiano or pecorino, and garlic, as well. Some use balsamic, others use wine or sherry vinegar. Maybe you will find below something that will appeal to you?
  • Your favorite green herb, favorite hard cheese, garlic and, favorite nuts
  • Spinach, garlic, favorite nuts and hard cheese, lemon zest
  • Grilled beats, garlic, favorite nuts and hard cheese, orange skin and hard goat cheese 
  • Radish leaves, favorite nuts and hard cheese, garlic
  • Kale, garlic, favorite nuts and cheese
  • Tofu, garlic, basil and favorite nuts
  • Fava beans, basil, garlic, favorite nuts and hard cheese
  • Green peas, favorite herbs, hard cheese and pine nuts
  • Starflower, garlic, favorite nuts and hard cheese
  • Yellow bell pepper, hazel nuts, favorite cheese and garlic
  • Strawberries and basil
  • Pistachios, hard cheese, garlic
  • Walnut, thyme
  • Salade romaine, parsley, favorite hard cheese
  • Almonds, basil, ricotta and olives 
  • Sage, walnuts, parsley, favorite hard cheese
  • Walnuts, basil, mushrooms 
  • Yellow bell peppers, orange flower water, orange skin, favorite hard cheese
  • Green asparagus, basil, mint, lemon balm, favorite hard cheese
  • Coriander, wasabi, sesame seeds, lime
  • Coriander, cashew nuts
  • Artichokes, almonds, parsley
  • Carrots, garlic, favorite hard cheese and herbs


Green Arugula and Basil Pesto with Walnuts (makes one jar around 300 ml)

Ingredients:
180 g fresh arugula, washed and drained
1 bunch fresh basil, washed and drained
50-100 ml good olive oil (depending on your individual taste)
3 garlic cloves, peeled
40 g walnuts
40 g grated parmigiano regiano
Grated lemon zest from ½ lemon, preferably organic

Preparation:
On a hot frying pan, grill walnuts evenly for about 5 to 6 minutes and let them cool down.
Put all the ingredients (except for olive oil) in your food processor or a blender. Process the ingredients in short pulses until nearly smooth (remember however, that you should still see tiny pieces of all ingredients). If necessary, scrap down the sides of the processor’s bowl.
Then remove your thick pesto from the processor’s bowl and place it in another bowl. Add olive oil little by little, mixing constantly and checking your preferred texture. Taste and eventually add some salt and pepper; however I do this only once the pesto is already mixed with the noodles.
Mix immediately with hot noodles. If you do not like thick pesto, add a bit of cooking water from pasta into the bowl which you mix your noodles in. The excess of pesto may be placed in a jar or an airtight container, and stored in a fridge up to few days. You can eventually freeze it.


Red Dried Tomatoes and Grilled Red Bell Pepper Pesto with Pine Nuts (makes 1 jar around 300 ml)

Ingredients:
250 g half dried tomatoes (you may use dried tomatoes as well)
2 garlic cloves, peeled
4-5 basil leaves, washed and drained
1 red bell pepper
1 pinch powdered chili
40 g pine nuts
40 g grated pecorino romano
50-100 ml olive oil (depending on your individual preferences)

Preparation:
On a hot frying pan, grill pine nuts evenly for about 3 to 4 minutes and let them cool down.
Preheat oven until 180 degrees. Place your bell pepper on a baking sheet and bake it for about 30 to 40 minutes, or until its skin is well grilled and does not stick to the bell pepper anymore. Flip the bell pepper occasionally, so it will bake evenly.
Remove the bell pepper from the oven, put into a plastic bag and let cool down. Then remove it from the bag, place it on a cutting board, and cut it along. Remove gently its stem, the seeds and peel the skin using a small and sharp kitchen knife.
Put all the ingredients (except for olive oil) in your food processor or blender. Then follow the actions described in the green pesto preparation above.


White Eggplant and Garlic Pesto with Walnuts (makes 1 jar of around 220 ml)

Ingredients:
1 medium sized eggplant (around 300 g), washed and wiped
3 medium garlic cloves, peeled
40 g walnuts
40 g pecorino romano cheese, grated
4-5 basil leaves
50-100 ml olive oil

Preparation:
On a hot frying pan, grill walnuts evenly for about 5 to 6 minutes and let them cool down.
Preheat oven until 180 degrees. Prickle the eggplant with a knife all over. Cut 2 garlic cloves into quarters and place them into slits. Place the eggplant on a baking sheet and bake it for about 30 to 40 minutes, or until its skin is well grilled. Flip the eggplant occasionally, so it will bake evenly.
Remove it from the oven, and let cool down a bit. Place it on a cutting board, and cut the eggplant along into halves. Remove gently its stem, the seeds and skin using a small and sharp kitchen knife.
Put all the ingredients (except for olive oil) in your food processor or blender. Then follow actions described in green pesto preparation above.


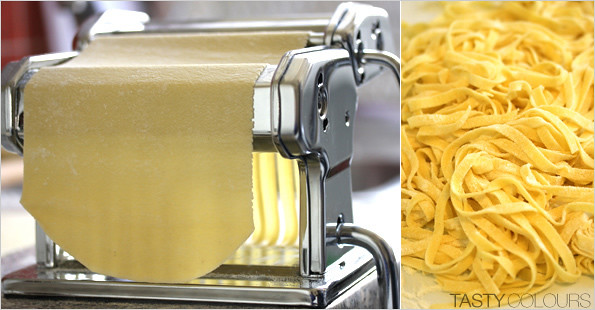
Homemade Tagliatelle

Serves about 6

Ingredients:
250 g soft wheat flour
250 g durum wheat flour
5 eggs (room temperature)

Preparation:
Pour the flour into a bowl and the eggs into the middle of the flour. Mix the eggs with a fork until they are completely blended with the flour. Knead the mixture with your hands, until it is completely homogenous and consistent. If the mixture is too dry add some water, if it is too soft add some flour. A good mixture should never stick to your fingers. Remove the mixture from the bowl and place it onto a lightly floured table. If necessary, continue to knead the dough.
Divide the dough into 3 or 4 equal parts.
Place the first part on your working table.
Wrap the rest in a plastic film and put aside.
Sprinkle some flour on your station and start rolling out the dough until it is 2 to 3 millimeters thick.
Occasionally, flip the dough and sprinkle some flour over it so it does not stick to the table.
When the dough is rolled out, sprinkle a bit of flour, roll and then cut across finely (they should be around 0,5 cm wide). Mix the noodles, sprinkle with some more flour so it will not get sticky and it may dry out a bit.
In a large saucepan, bring water to a boil and add some salt and a bit of oil.
Put the noodles into boiling water and cook al dente between 2 to 3 minutes, depending on their thickness. Then strain the noodles, and keep a bit of cooking water in the saucepan. Mix the noodles with pesto, according to your taste. Serve immediately, sprinkled with some more cheese, basil leaves, salt and pepper. 

And then go for a walk, burn those tasty calories and enjoy the beautiful weather, the spring, the sun and the smells.

Tuesday, April 20, 2010

My Plan for Cheesecake

We like to make plans. We plan our future and we think that everything will happen the way we want. We think that our lives are in our hands and that we can decide about everything. We are convinced that we will always be in a good health, and nothing will change for worse. We get frustrated easily if something does not work out.

My mum visited us for Easter. She brought a lot of Polish specialties, and curd cheese - "twaróg" (I can get it in Paris, as well, in stores carrying Polish food and specialties, but this one straight from Poland is better and much cheaper). Some time ago I decided to bake a Kraków – style cheesecake ("sernik krakowski"), although I am not a great amateur of cakes. And probably it is a pity, because in Poland to baking and eating cakes is a great tradition.

My mum left on Friday, the 9th. I opened the box of cheese in the late afternoon. It was still good, but on that day it was already late and I planned to bake the cake on the next morning only.

That Saturday, April 10th, I got up later than usual. It was ten o’clock already; I sat down on our comfortable coach, sipping my (instant) coffee with milk, I turned my PC on, and once I opened the Gazeta Wyborcza web page, as I do every morning, I thought that there was something wrong with me. It could not be possible that the governmental plane carrying the Polish President Lech Kaczyński and his wife died in a plane crash close to Smoleńsk in Russia, just like this. It could not be true that they crashed just before visiting Katyń, to celebrate the 70th anniversary of the Soviet massacre.

“The plane carrying the President and his wife crashed” – I screamed at my husband and his shocked face reflected that indeed, something was wrong with me. But second after second, and minute after minute, once we switched the Polish TV on, we realized, that I was fine and that the plane did crash, that not only the President and his wife died, but also dozens of top officials and the crew members, leaving their families in despair and the nation in a shock. It was not only a horrible truth, but a scary ironic snigger of history. Even though I did not vote for him and his right wing and conservative party “Law and Justice”, I was paralyzed by the scope of the tragedy.

I then forgot about the cheese. Being far away from Poland, I spent nearly the whole weekend in front of TV, watching the news.

On Monday, I realized that the cheese was not good anymore. The plan to bake a cheesecake collapsed. Instead, we made 60 pierogis with potatoes and cheese – using by the way – my new pasta machine I got from my aunt as a birthday gift.

And then suddenly my friend called from Warsaw, announcing that she would be visiting Paris the next day. Thanks to her, I was again offered some fresh curd. I baked the cheesecake on Thursday evening. And on Friday, the sky over the Europe closed because of the volcanic cloud…

The President and his wife were buried last Sunday, in a crypt of the Royal Castle in Kraków.

The official national mourning is finished. And a politician from the President’s party, Law and Justice, said today: “We will put sepia billboards with sad eyes and a signature of Jarosław Kaczyński all over Poland (the President’s twin brother) and we will win the Presidential elections from scratch”.

Yes, national mourning is finished. 

But last week I had a nice surprise. My recipe for oscypek with lingonberry preserves, presented some time ago on the blog, was awarded by Edyta from EKOQUCHNIA, who organized a slowfoody action on her blog. I won a culinary slow food book. It is a first little success, encouraging for a new blogger. Thanks, Edyta!


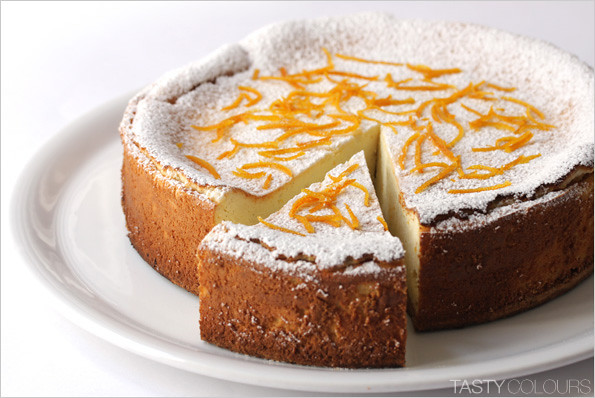
Variation on Kraków Style Cheesecake

“Kraków Style Cheesecake” ("sernik krakowski") is a Polish classic. However, recipes vary so much that one genuine recipe does not exist. The traditional Kraków Style Cheesecake should have a square or a rectangular shape with pastry lattice on top. Often, people cover the cake with icing, which I really hate. I was thinking about this cheesecake for a couple of weeks, analyzing recipes that I have at home and those I could find on the web. I wanted my cheesecake to have crispy sweet dough at the bottom; that is why I decided to use my husband’s recipe. I do not like aroma extracts or vanilla sugar, used in many recipes, so I decided to candy orange skin and use a lot of grains from fresh vanilla beans. I resigned from raisins. I thought it would be too much. However, you can use some, if you like.
I reduced the amount of sugar a bit. I finally used 180 grams and when I will make the cake next time, I definitely will use no more than 150 grams. This is, however, a matter of personal taste.
I used fresh, Polish curd cheese, which has a solid texture. You can find this type of cheese in stores carrying Polish and Russian food. In lack of both, you can try to replace this cheese with ricotta, however, both taste and texture will be a bit different.
And I baked my cake in a round mold.
Finally, as you can see, my cake rather is a variation of the traditional Kraków Style Cheesecake, instead of the original one.
I gave one half of the cake to our favorite butcher, Monsieur Bajon. I cannot wait to find out whether he liked it or not and I will visit him again soon.


Makes 1 round mold 6 cm high of 22 cm diameter

1. Sweet dough

Ingredients
100 g powdered sugar, sifted
125 g butter
Salt
1 egg
250 g flour

Preparation
In a mixing bowl, place butter, sugar and salt. Mix with a wooden spatula until the butter gets white.
Add the egg and mix furthermore until the mixture gets whiter by adding air into it.
Add the flour and do not over mix. By over mixing the flour, the dough will shrink while baking.
Empty the bowl on a table and work with your hands to complete the mixing of the dough. Form a ball and let the dough rest in the refrigerator for a few hours.
This recipe makes more dough than needed for the cheesecake. You can easily freeze the remaining part and use for another cake or a sweet tart.


2. Candied orange skin

Ingredients
1 medium orange, carefully washed and dried
50 g granulated sugar
Water

Preparation:
Peel the skin of the orange with a peeler. Remove the white part of the skin by scratching it with the blade of a small kitchen knife.
Use a sharp knife to cut the skin into a fine julienne.
In a small saucepan, put the sugar and barely cover it with a bit of cold water.
Cook sugar until the “thread” stage (the syrup drips from a spoon, forms thin threads in water) - about 110° Celsius.
Add the orange skin into the syrup and cook slowly for about 5 minutes.
Remove skin from syrup and place it in a container to cool down.

3. Cheese filling

Ingredients
720 g fresh fat or medium fat curd cheese (sold in stores carrying Polish or Russian food; eventually to be replaced with ricotta)
180 g powdered sugar, sifted; plus some extra for the finishing
4 eggs – separately whites and yolks
2 table spoons potato flour, sifted
2 vanilla beans
80 g soft butter
100 ml whipping cream
Candied orange skin from 1 medium orange

Preparation
Start from preparation of vanilla beans and orange.
On a cutting board, cut vanilla beans along and remove grains with a sharp, small kitchen knife. Put them aside. Throw the beans away or use for another purpose.
On a cutting board, place ½ of the orange skin and chop it as finely as possible. Should it be too sticky, dissolve in a bit of water and dry out before chopping. You should obtain your orange crumbs ready.
Preheat the oven to 180 degrees.
Remove the sweet dough from the fridge. Cut it into halves. Using a rolling pin, roll out the dough in a circle. It should be about 24 cm in diameter and around 7-8 mm thick. Place it on a baking sheet.
Wrap the remaining dough and freeze it (you can use it for another cake).
Using a fork, prick the surface of the dough and bake for about 8 minutes. Remove from the oven and right away, before it gets hard, cut the dough circle to the exact size of your mold.
Start preparing the cheese mixture.
In old recipes it is advised to grind the cheese using a meat grinder. The texture of the cheese is quite consistent and before mixing it with other ingredients it should be worked into a homogenous mixture.  I do not have a grinder in Paris. I simply used a food processor using the kneading hook attachment, which easily changes the block of curd into a smooth mixture. You can try to do this with a potato masher or even a fork, but you probably will not get the same texture.

In a bowl, or in a food processor, mix butter with egg yolks, until the mixture is homogenous and smooth. Add vanilla and crumbs of candid orange skin, mixing all the time. Then little by little, add powdered sugar and potato flour. Mix until the sugar is completely absorbed by butter and egg yolks. Add cream and mix everything. At the end, add – little by little – the cheese and mix until the mixture is completely smooth. Put aside. In a separate bowl, whip the egg whites until stiff (add a bit of sugar about half way). Then fold the egg whites delicately into the cheese “appareil” one third at a time.

Preheat the oven to 170 degrees.

Place the sweet dough at the bottom of the mold and pour the cheese mixture over it. Make sure that the surface is even. Bake between 30 to 40 minutes. The cake is ready once the blade of a knife or a wooden stick remains dry after its insertion into the cake. The cake will grow during baking. Switch the oven off, open the oven door a bit, and leave the cake inside for another 10 to 15 minutes so its surface will not suddenly drop. Then remove the cake from the oven.
Once the cake is completely cooled down, remove the cake from the mold. Sprinkle the surface with some extra powdered sugar, and decorate with the remaining orange skin.

Tuesday, April 6, 2010

Good to “Meat” you Pigs!

I like meat, but I like good quality meat first of all. If I do not have the access to good meat, I simply prefer to cook vegetarian dishes or eat fish.

My childhood occurred in the middle of the seventies and eighties.  In communist Poland the food market was regulated of course. Meat, especially good meat, was practically not accessible in state’s owned shops. And in the eighties, during the ever-lasting crisis, I remember my parents and me spending hours in lines to buy meat of poor quality.

After I was born, the first food regulations and ration stamps were introduced in 1976. They concerned sugar supplies. Then in 1981 the Government introduced other numerous limitations: meat, butter, kasha, rice, flour, oil, soap, cigarettes, sweets, alcohol and gasoline were regulated and sold in exchange of ration stamps. But despite those regulations, shops were usually empty and lines in front of them were endless. At the same time the Government was increasing prices of food and other goods.

On the other hand, informal distribution channels existed and it was not especially difficult to buy meat, even on a food market (for example, Kleparz in Kraków), from individuals and farmers. As regards my family, we occasionally had some supplies from the countryside. Two or three families were buying a quarter or a half of a calf and shared its meat. And yet, we used to spend a lot of holidays in the countryside.  We boarded at private cantinas maintained by local farmers, where meat was served on a daily basis.

All in all I can say that in our home we did not lack any meat, although to get it required much effort from my parents.

Today, more than 20 years after the change of political system, everything has changed. In general meat is accessible; however paradoxes still exist. The percentage of poor people in Polish society is still high. In some regions of the country it is difficult to buy veal, for example, as it simply is too expensive and people cannot afford it.  On the other hand, production of “industrial” chicken developed so much that one can have difficulties finding chicken meat from the countryside. And, in general, you will not easily find meat from ecological farms in Poland. It is not so easy either to buy fresh duck, or goose (as far as I know most of the Polish goose production is exported, for example) - you will rather buy them frozen when you actually can find them in some shops. Further, lamb meat is not so common; during my last visit to Kraków I had an impression that it was easier to get lamb meat from New Zeland than from Poland. Still, even cheaper rabbits are not so easy to find. Moreover, traditional butcher shops tend to disappear.

That’s why since I have been living in France, I really appreciate to have access to such a large variety of meat. And moreover, fortunately, we have here Monsieur Bajon, located rue de l’Abbé-Grégoire, an excellent traditional butcher. He sells meat of excellent quality and you can always order anything you wish. He is not cheap, but not exceptionally expensive by Parisian standards, of course. On the other hand, as I already indicated, I prefer to eat good meat once in a while instead of bad meat every day.

Meat is not the only thing I like from animals. Besides brains, which I do not like, I really enjoy offal such as tripe, veal’s thymus, beef’s tongues, jelly preparations and other nasty things, even a liver!, although it is true that I do not eat them so often.

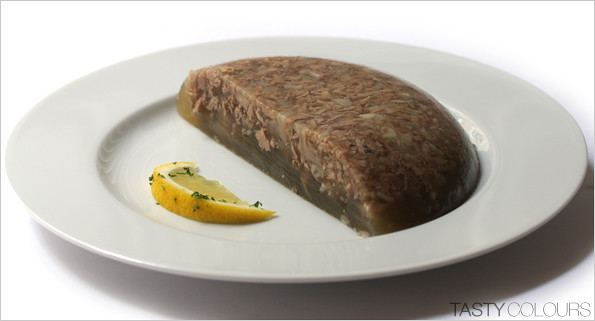
My favorite dish of that type is homemade jelly from pig trotters and veal.

It is a very old fashioned dish and time consuming to prepare. Jellies are popular in Poland, but those you can find in stores are made with processed gelatin and have a poor taste: they do not have this rich flavor obtained by a long cooking process which naturally retrieves the gelatin from the bones. Moreover, in stores you will rather find jellies with chicken meat produced in huge farms that I find quite tasteless.

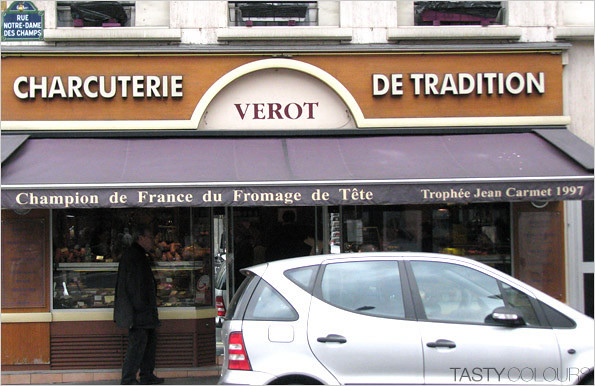
In France, people used to eat jellies as well. This kind of preparation seems to be old fashioned, and is not so popular anymore. But some traditional and renowned traiteurs are still famous for them and have a faithful clientele who buys them. For example, I recently had a quick look at Gilles Verot, the famous traditional charcuterie located at the beginning of rue de Notre-Dame-des-Champs.

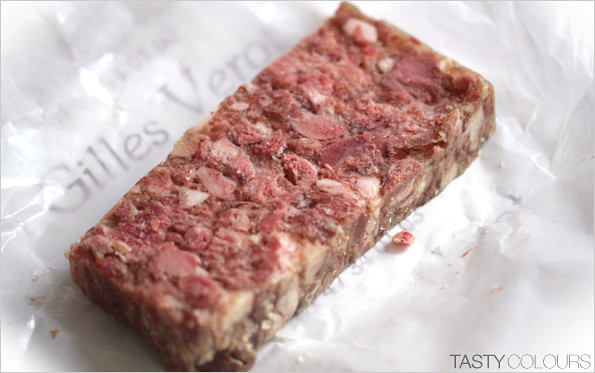
Giles Verot is well known in Paris, inter alia, thanks to his traditional “fromage de tête”, which simply is a meat jelly made with meat from the head of a pig. In France, Verot was elected champion in this field, and the information is proudly displayed on the front of his shop.  For a certain time now, Verot’s charcuterie products can also be found in New York City, in the trendy Bar Boulud on Broadway.


I have tried this famous fromage de tête, as I love meats in jelly.  It surprised me. Well, I found that both the meat (which was of good quality) and the jelly were actually quite salty, much more than I am used to. The texture was nice, firm as I like it, the presentation excellent. It was good… but all in all I must admit that I prefer the rustic jelly that my Mum prepares. The experiment with Verot’s famous fromage de tête brings me to the conclusion that despite our culinary experiments and good sentiments for foreign culinary traditions, we are very strongly attached to our individual tastes from childhood.


My mum masters the preparation of an excellent jelly made from pigs trotters cooked for hours with spices and veal meat. She does not use any extra gelatin, as the pigs trotters have a lot of natural one. Her recipe is full of meat, spices, with a slight garlic aftertaste, and has a funny texture that I like. It is firm enough but not too hard. Simply delicious. I am sharing here with you this recipe:

Veal in Pig’s Trotter Jelly

Serves 10-12

Ingredients:

2 kg raw, non salted pig’s trotters (around 4 pieces), cut into halves
600 g good quality veal for stew
3 bay leaves
10 grains black pepper
10 grains allspice
1 small leek (around 150 g), only the white part, washed
1 medium carrot, peeled and washed
1 medium parsley root or parsnip, peeled and washed
¼ medium celery root (around 150 g), peeled and washed
1 big onion, peeled, cut into halves and slightly grilled (on
gas stove or on a frying pan)
8 large garlic cloves, peeled and mashed in a mortar
3-4 tablespoons chopped parsley
Salt
Pepper
4-5 lemons
Large saucepan (5 liter capacity)
2 large bowls, around 2 liter capacity


Preparation:
Boil 2 liters of water, place pig’s trotters in a large saucepan and parboil them for 2 minutes.
Strain and throw the water away.
In the same saucepan, bring to a boil around 3 liters of water.
Add pig’s trotters.
They should be completely covered by water.
Add spices: pepper, bay leaves, allspice and onion.
Cook under cover over a very low flame for around 4 to 5 hours.
By the end of cooking, the trotters should to go into pieces.
After 3 hours of cooking, add veal meat cut into two equal slices.
Bring to a boil and lower the flame.
The meat has to be slightly covered by the broth (if necessary, add a bit of boiling water to cover it).
Cook nearly completely covered (leave a small space to evaporate the eventual excess of broth).
It is really important to control the amount of broth: if there is too much of it, you risk that the jelly will not set well; on the contrary, if the broth evaporates too much, you will not have enough broth and the jelly will be too hard.
After 4 hours of cooking, add vegetables: leek, carrot, parsley, celery and half of the garlic cloves.
Cook between 40 minutes and one hour, over a low flame and nearly completely covered, checking occasionally the volume of the broth and its thickness.
5 minutes before the end of cooking (the broth should be thick and the veal should be really soft), add remaining garlic; season with salt and pepper. Then turn the heat off and put aside.
Prepare two strainers: one, big to separate the meat and vegetable from the broth and the second one (the best is a chinois) to strain the broth and remove smaller solids.
Using the larger strainer, strain the broth.  Only throw away the vegetables and put the rest aside, to cool down a bit. Reserve the broth!
Strain the broth again using the chinois. Throw away all leftovers. Put the broth aside. The purpose of the second straining is to ensure that the jelly with have a nice color and will remain transparent.
Then prepare the meat: cut the veal into very thin and small pieces, along fibers.
As regards pigs trotters, remove all bones and throw them away. Throw away the skin and the greasy parts as well. If there is any meat, add it to the veal meat. And if you like cartilage, you can add little bits of it cut into tiny pieces.
Depending how you want to serve the jelly, you can either distribute the meat equally into several tiny bowls or between 2 large bowls only. Whichever method you choose, always distribute equal quantities of meat into each bowl and pour an equal amount of broth over it. Mix delicately.
Once the liquid has cooled down, cover the bowls with a plastic film and place them in a fridge overnight, so the jelly can set.
On the next day, remove the bowls from the fridge and remove the excess of fat from the surface of the jelly (provided that you do not like it).
Before serving, unmold the jelly from the bowl and serve it cut into slices (once the jelly is solid it is rather easy to unmold and slice).
I serve this dish with quarters of fresh lemon, sprinkled with some fresh, chopped parsley. You can also serve it with a good wine or cider vinegar.
Consume within 3 days because jellies cannot be kept for a long time.

Tuesday, March 30, 2010

“Nightmare” dish - Łazanki


You will find below a quick list of my few favorite “nightmare” dishes, which I could not stand when I was a kid:

- Scrambled eggs with veal’s brains (which I still hate)
- Milk soup (I still hate it now)
- Cooked spinach (I like now)
- And łazanki (which I now like).

Do you have any food nightmares from your childhood you want to share?

Łazanki. The “prototype” of this old pasta dish with square noodles was probably brought to Poland in the 16th century by Bona Sforza, the Italian wife of King Zygmunt Stary (the dish is known under the same name in Belarus as well).
As a child, I did not have any idea about the Italian origins of łazanki, but this was not the reason why I did not like it.
To me, the dish was synonymous of something overcooked, sticky, gluey, greasy, too salty or on the contrary not salty enough. I was a cantina kid and łazanki were usually served once a week in my school, prepared in the manner that I describe above. “Łazanki” were usually served with overcooked (or not cooked enough) sweet or sour white cabbage, pork back grease and pieces of sausage or ham. Sometimes some sour cream was added.
This is how I remember the dish. The only worse food was veal’s brain served with scrambled eggs, which I still hate nowadays.

Now I can eat łazanki, but it took me years. And, sorry guys! I only like the dish when I prepare it on my own – traumatic memories still work. I would rather cook the version without any bacon, although it is not so traditional.

There are my keys to my favorite and only łazanki dish I eat:

First of all, I use Savoy cabbage, instead of white cabbage. This preparation is quite well known, but is not so common. I do not like cooked white cabbage, although I like it raw or soured. On the other hand, I love cooked Savoy cabbage, which is more delicate and tender. I never use pork grease; instead, I use olive oil, butter or even goose grease.

Secondly, I make my own square noodles. They taste so much better in comparison to łazanki noodles you can buy in stores. Instead of all purpose flour, like in my recipe, you can try to use buckwheat flour, organic rye flour, but then you will have to be careful, as usually organic flour takes more liquid. This is why I give you the recipe for those simple square noodles.

Thirdly, I like to add bryndza and/or “oscypek-like” cheese to the dish, if I have them handy of course. If not, I add some fresh tomme, or gruyere, or nothing. Traditional łazanki usually is not served with any cheese.

Fourthly, I add a lot of fresh forest mushrooms. Surely you can use frozen ones, as you would do it now because the mushroom season is over.

Fifthly, I grill the whole dish in the oven before serving. Et voila!

You might remember that I wrote about oscypek a few weeks ago. Today I mention bryndza which is another cheese that may be used in the recipe. You probably do not know this cheese, and I owe you a few words of explanation.
Bryndza podhalańska is a Polish variety of the soft bryndza cheese, which is known in other countries of the region (for example, Slovakia). The name of the cheese probably finds its origins in the Romanian term “brinze”. The first written recipes for bryndza come from the XVIth century (confirmed in documents issued by landowners and in Royal decrees. Bryndza is made from sheep’s milk and it has a strong, salty or slightly salty taste, sometimes even sour. The cow’s milk content, if any is used, should not exceed 40 % of the total amount of milk used in production. Now it has a geographical indication under European Union law. Bryndza is produced only from May to September. You can buy industrial “substitutes” in markets or, from local farmers, all year round (usually both add more cow milk).
Bryndza usually is eaten as a topping on tartines, with addition of fresh, sliced tomatoes, sour cucumber and fresh herbs. It also is a wonderful filling for some types of pierogi, noodles, Polish-style gnocchis, button mushrooms and a variation of potato pancakes.

One last good thing about łazanki: it tastes even better the next day, after a night in the fridge.

Łazanki

Serves 4

Ingredients
400 g square noodles (recipe below)
500 g Savoy cabbage, washed and finely chopped
350 g fresh ceps or bolets
100 g bryndza and / or oscypek cheese (optional, you can use your favorite cheese or just omit it)
200 ml vegetable broth
2 onions, peeled, washed and finely chopped
4 tablespoons goose grease
2-3 tablespoons butter
2 bay leaves
2-3 grains allspice
Salt
Pepper

Preparation
Delicately clean the ceps from the leftovers of the forest.
Scratch the stems to remove soil.
Rinse the mushrooms delicately under cold water.
Dry them with a paper towel and cut them into parts of equal sizes. If the mushrooms are small you do not have to slice them.
In a hot saucepan, melt butter and cook onions until gold, for around 10 minutes, over a small flame. Do not let onions burn.
Add mushrooms and fry over a medium flame, mixing often, until the mushroom juice evaporates completely.
Simultaneously, in a second saucepan, melt the goose grease and cook the cabbage with bay leaves and allspice over a medium flame, until slightly soft.
Then add mushrooms and onions, pour the broth and cook slowly until the broth evaporates. Add cooked noodles. Salt and pepper generously and mix.
Place the dish in a backing pan, sprinkle with cheese and place into the oven preheat to 180 degrees.
Bake for 15 minutes, until the cheese is melted and slightly grilled.
Remove from the oven and serve hot.


Home made square noodles - łazanki

Serves 4

Ingredients
250 g flour
2 eggs
A pinch of salt
Eventually 2 tablespoons, water

Preparation
Sift flour on your working table.
Form a well in the centre.
Place eggs and salt in the well.
You can add 2 tablespoons of water at room temperature.
Mix all the ingredients with a plastic scraper and then knead the dough energetically.
After 10 minutes your dough should be elastic and ideally smooth.
Divide the dough into two equal parts.
Place one part on your working table.
Wrap the second half in a plastic film and put aside.
Sprinkle some flour on your station and start rolling out the dough until it is between 1 and 2 millimeters thick.
Occasionally, flip the dough and sprinkle some flour over it so it does not stick to the table.
When the dough is rolled out, let it dry out a bit for about 10 minutes.
After that time sprinkle a bit of flour over the dough and cut oblong strips of dough (about 1.5 cm wide). Then cut the strips across cut across to obtain squares of dough. Mix the noodles so they will not get sticky; they may even get a bit dry.
Repeat the actions with the second half of dough.
In a large saucepan, bring water to a boil and add some salt and a bit of oil.
Place the noodles into the boiling water by small batches at a time and cook between 6-8 minutes, depending on their thickness.
Strain the noodles. Rinse them under running cold water and use according to your recipe. You may also keep the noodles in the refrigerator for a few days before using them with your favorite recipe.

Friday, March 26, 2010

Easter Tartar Sauce

Easter approaches. I am attached to tradition and I have a strong will to prepare traditional recipes for Easter. I miss rustic tastes. In my French family,  Easter is not as extensively celebrated as it is in the Polish part of the family. French are not sentimental about eggs, for example. They do not prepare homemade pisanki (Easter eggs).
Tartar Sauce is one of my favorite Easter egg accompaniments.
In fact, I prepare it several times a year. It is always served for Easter (as an accompaniment to eggs and homemade patés) and for Christmas (as one accompaniment to hams and patés). However, it tastes deliciously with breaded buttoned mushrooms, potato crockets and warm meats (which I will present some other time).
I made a quick research before publishing this post. I wanted to investigate about the name of the sauce, to no avail. Besides the connotation of the Tartar tribe and the ancient definition of mythological hell, I did not find anything.
Does anybody have any idea about the origins of the sauce? Why it is called “tartar”?
This classical and old-fashioned sauce is known in several countries. It is well known in France, as well, and you can buy it in nearly every store and order it in many restaurants serving traditional food.
The French version, which differs from Polish recipes, does not find my personal approval; it usually is too thick, thanks to mayonnaise, and awfully sour, thanks to French extremely acid vinegar cornichons.
Traditional Polish recipes use as well a lot of mayonnaise. I like mayonnaise, especially when it is homemade and made by my husband. I prefer, however, to “break” its texture and its taste by adding cream, mustard and sometimes horseradish.
My version of the Tartar Sauce is based on homemade pickled ceps (which you can find in stores carrying Polish food, as well) and sour cucumbers (instead of cornichons) – two famous Polish specialties.
I find this version tastier. I think that the flavors are well balanced. The sauce is more delicate, but still quite acid, like it should be. I have tried recipes with capers, but I always come back to my version, which uses a lot of chives and dill as well.


Makes around 250 ml of sauce

Ingredients
1 hardboiled egg
4 tablespoons marinated ceps, finely chopped - around 50 g
5 tablespoons sour cucumbers, peeled and finely chopped (optional: cornichons) – around 100 g
2 tablespoons finely chopped chives
1 tablespoon finely chopped fresh dill
3 tablespoons mayonnaise
3 tablespoons organic cream (or Greek-style yoghurt)
1 teaspoon Dijon mustard
1 tablespoon ice cold water
Salt and pepper
1 teaspoon lime juice
A pinch of powdered sugar

Preparation
Separate the egg white and the egg yolk.
Finely chop the egg white.
Mash the egg yolk with a fork and put aside.
In a bowl, mix egg white, cucumber and cep.
In a separate bowl, mix the egg yolk with mayonnaise, cream and mustard.
Add a pinch of powdered sugar and a spoon of water.
Beat until you the sauce becomes creamy.
Add chives, dill, salt and pepper according to you taste.
If the sauce is not sour enough, add a bit of freshly squeezed lime juice.
Refrigerate before serving.
Related Posts Plugin for WordPress, Blogger...